近期 Line Notify 宣告將於2025/3/31停止服務, 因此想轉移相關業務到 Telegram Bot.
簡單研究了一下基本用法 (傳送訊息、表情貼圖)
目前我的使用環境為在Mac上面使用Jenkins 透過 curl 來完成 Telegram Bot 通知
1.建立自己的私有Telegram帳號
2.將官方的Bot @BotFather 加入好友

3.在對話中使用 /start 指令開始選單

4.在對話中使用 /newbot 指令建立新的 bot 機器人
這邊會讓你先輸入此bot的顯示名稱(可以使用中文,允許與他人重複)

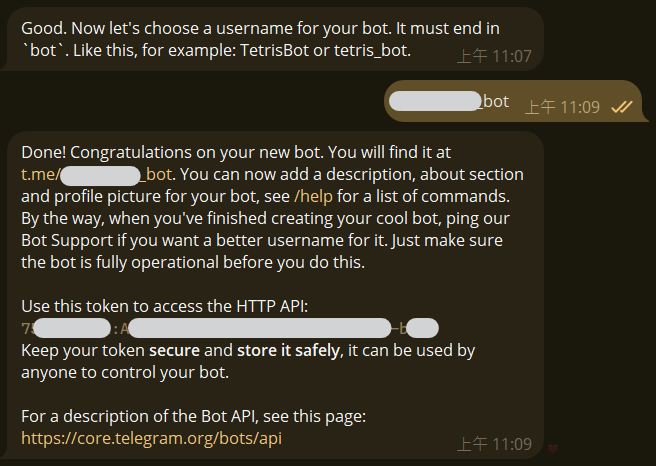
5.再來會讓你輸入此bot的帳號名稱(需為唯一),此名稱需要使用英文字母 bot 當後戳
6. 自訂自己的bot

點選目前的bot後會開啟選單

這邊可以從 Edit Bot -> Edit Botpic 修改 bot機器人的圖片
7.使用 Token 與 getUpdates API 獲取你的Bot收到的資訊
在/mybots選單點選 API Token 也可獲取你的BotAPIToken
然後透過 getUpdates API獲取你的bot的資料
https://api.telegram.org/bot你的BotAPIToken/getUpdates
在剛建立的bot下應該會顯示如下JSON內容
{"ok":true,"result":[]}8.建立一個群組邀請你的bot加入


發送後就可以在 getUpdates 看到聊天室的ID了

9.有了聊天室ID就可以透過此ID開始使用Bot發訊息到指定聊天室
發送訊息指令為
curl -X POST "https://api.telegram.org/bot你的BotAPIToken/sendMessage" -H "Content-Type: application/x-www-form-urlencoded" --data-urlencode "chat_id=你的聊天室ID" --data-urlencode "text=你的訊息"
如果希望使用靜音模式可在最後面增加參數 -d "disable_notification=true"
10.用Bot對群組發送貼圖
要發送貼圖需要貼圖ID ,可在/mybots選單點選@xxxbot帳號直接開始聊天,只要對bot直接發送貼圖就可以在 getUpdates 拿到貼圖 ID (file_id)

發送貼圖指令為
curl -X POST "https://api.telegram.org/bot你的BotAPIToken/sendSticker" -H "Content-Type: application/x-www-form-urlencoded" --data-urlencode "chat_id=你的聊天室ID" --data-urlencode "sticker=你的貼圖ID" -d "disable_notification=true"
同樣如果希望使用靜音模式可在最後面增加參數 -d "disable_notification=true"
11.用Bot對群組發送圖片
發送圖片指令為
curl -X POST "https://api.telegram.org/bot你的BotAPIToken/sendPhoto" -d "chat_id=你的聊天室ID" -d "photo=你的圖片位置" -d "caption=你的圖片附帶文字"
進階用法: 產出QRCODE圖片
curl -X POST "https://api.telegram.org/bot你的BotAPIToken/sendPhoto" -d "chat_id=你的聊天室ID" -d "photo=https://api.qrserver.com/v1/create-qr-code/?data=你的QRCODE目標&size=128x128&ecc=Q" -d "caption=你的圖片附帶文字"
進階用法: 使用本機圖片
curl -X POST "https://api.telegram.org/bot你的BotAPIToken/sendPhoto" -F "chat_id=你的聊天室ID" -F "photo=@/Users/XXXX/Desktop/download_qrcode.png"
同樣如果希望使用靜音模式可在最後面增加參數 -d "disable_notification=true"
12.用法整合
我在Jenkins的環境變數直接將指令加入,使用時就可使用簡短的指令即可
發送訊息 TG_NOTIFY_MSG
環境變數值
curl -X POST "https://api.telegram.org/bot$TelegramToken/sendMessage" -H "Content-Type: application/x-www-form-urlencoded" --data-urlencode "chat_id=$TelegramChatRoomId" --data-urlencode "text=MSG_CONTENT" -d "disable_notification=true"
Shell 用法
TG_MSG_VAL=你的訊息
eval "${TG_NOTIFY_MSG/MSG_CONTENT/${TG_MSG_VAL}}"
發送貼圖 TG_NOTIFY_STICKER
環境變數值
curl -X POST "https://api.telegram.org/bot$TelegramToken/sendSticker" -H "Content-Type: application/x-www-form-urlencoded" --data-urlencode "chat_id=$TelegramChatRoomId" --data-urlencode "sticker=TG_STICKER" -d "disable_notification=true"
Shell 用法
TG_STICKER_ID=你的貼圖ID
eval ${TG_NOTIFY_STICKER/TG_STICKER/${TG_STICKER_ID}}
發送QRCODE圖片 TG_NOTIFY_QRPHOTO
環境變數值
curl -X POST "https://api.telegram.org/bot$TelegramToken/sendPhoto" -d "chat_id=$TelegramChatRoomId" -d "photo=https://api.qrserver.com/v1/create-qr-code/?data=QR_URL&size=128x128&ecc=Q" -d "caption=QR_URL" -d "disable_notification=true"
Shell 用法
TG_QRCODE_URL=你的QRCODE目標
eval ${TG_NOTIFY_QRPHOTO//QR_URL/${TG_QRCODE_URL}}
參考資料
10 分鐘快速移轉 Line Notify 到 Telegram Bot 通知


沒有留言:
張貼留言